Text and photographs are © by Ellen Spector Platt & Ellen Zachos, all rights reserved.


Sunday, May 31, 2009

street hort...it tastes good


I give props to anyone who tries to brighten up our city streets with a little horticulture. But seriously folks, no hort is better than bad hort:


What does it take to keep a few evergreens alive? A little water, 6 hours of sunlight/day, and decent drainage in the container, that's what. If that's more than you can manage, be a mensch and admit it. In horticulture (as in everything else) it's wise to know your limitations. I'm not saying you shouldn't try to learn and grow as a gardener, but when you abdicate responsibility for the plants in your care, we ALL suffer. On the other hand, a single tree underplanted with a few shade loving begonias make a lovely, simple corner planting.

Street plants put up with a lot more abuse than plants on rooftops and in window boxes. Not all New Yorkers appreciate horticulture and those that don't can be brutal. I wear gloves when working with street plants, and not just because of the dog pee. You find all sorts of things in tree pits and curbside gardens: used kleenex, half eaten food, prophylactics (that's right, you heard me). Believe it or not, people actually steal plants from street plantings; it's not unusual to find a gaping hole in your tree pit, where once there was a glorious Caladium. (Ask Other Ellen, she knows what I'm talking about.)

This time of year, lots of restaurants add outdoor cafes, often surrounded by planter boxes. Do you suppose there's a correlation between the care given to a planter on the sidewalk and the care given to the food in the kitchen? Where would you rather eat?

Perhaps I'll experiment. Except I'm NOT eating at the last place...that Hibiscus looks pathetic with no flowers and all its bare branch ends. It doesn't bode well for the food inside.


Tuesday, May 26, 2009

HAY THERE!

My goal was to create an inexpensive garden play space for children where I could also try hay-bale gardening. Actually straw bales meant for animal bedding are better than hay; straw is all stem and with no grain seed, at least in theory, and straw bales are cheaper.
What I got was an architecture competition. Using 20 bales, my son, son-in-law, daughter, step-grandson-in-law and I vied for designing the best space. The three little girls didn’t care about the form, they climbed, scrambled, chased and hid no matter what the features, but they were particularly intrigued by the designs that included windows.When the party
disbanded for
the day, I re-
formed bales
into my own
favorite, then
planted the
top with low-
growing sedums
and semper-
vivums. First I
added about an inch of good garden soil to the tops of the bales, inserted the roots in the soil and watered them in. The plants were left to their own devices from then on, making it through the cold New Hampshire winter in Zone 4.This spring the plants are still growing strong and the girls now older and wiser will be coming back to play. The idea is that as the hay disintegrates, it turns into compost that will feed the plants. When the whole thing falls apart, the bales will be used for mulch between the rows of Jen’s fabulous veggie/cutting garden.

Note: If you’re
the kind who
worries that
the child might
fall off, don’t
try this at
home and
don’t try it
with toddlers
who might not
be able to
withstand the
slippage of a hay-bale. Above, the house last winter.

On the right, the house this spring: sedums and semps still viable.

Saturday, May 23, 2009

a busy week

It was a very busy week. No surprise there, since it's May and I'm a gardener. But between plant deliveries, runs to the Long Island nurseries, and planting, planting, planting, I haven't had time to think of a boffo blog post. So instead, I thought I'd walk you through a day in the life of a city gardener. (Warning, they're all cell phone photos; can't carry a big camera on these heavy work days.)

8 am: This brownstone backyard garden is just 12 blocks from home, so I often make it my first call of the day. Since it's an office I like getting it done early, before everyone comes in to work. Bulb foliage is still dying back here so I haven't planted the summer annuals yet. Right now I'm tidying up foliage, feeding, and planting window boxes. The annuals go in next week.

10:30 am: I walk between clients as much as possible. Since I wasn't carrying plants this morning, I walked through the park to the west side and admired the Aquilegia canadensis in the Ramble.

2:30 pm: Forgot to put on sunblock. Stupid, stupid, stupid! It was the first hot/sunny day in a while and I just wasn't thinking. After 4 hours I'm exhausted (and a little sunburned), but the garden looks good. There are two large terraces here: the north side (approximately 500 square feet) includes only white flowers and is where my clients often eat dinner. I use lots of silver, gray, and white foliage here too; it shows up nicely in the gloaming. The south terrace (approximately 600 square feet) is chock full of color. This year I've focused on pinks and yellows with a few purple accents thrown in. I started the annuals here on Monday and finished today.

3:00 pm: I walk back to the east side along the reservoir path. A moment of relaxation. I need to take this route more often. It's cooler by the water and the view can't be beat.


Whenever possible I pass this building on 79th, between 5th and Madison. Other Ellen has written about it before and it never fails to make me smile, even when I'm hot, sweaty, and utterly exhausted. It's a reminder of how much can be done with very little space; a real gardener can make magic with a few containers and some imagination. Now all I need is a cool shower and an even cooler drink.

Wednesday, May 20, 2009

THE WISTERIA ATE MY HOMEWORK

(Japanese wisteria (Wisteria floribunda) at the Brooklyn Botanic Garden)

The Chinese wisteria (Wisteria sinensis) that I once planted near my kitchen door and trained to form an archway over the back steps, reached the roofline of the house, scrambled across the eaves, escaped up the cedar shake roof to the chimney. It ran so far that I could no longer prune it. The sensual flower panicles diminished and ultimately stopped. We sold the house.

OK, the two events were
not related but twenty
years later I craved an-
other wisteria, one that
I swore I would keep
under control and force
into continuous bloom.
For my New York City
rooftop, I chose a selec-
tion of the native Amer-
ican variety W. frutes-
cens
‘Amethyst Falls’.
It grows only 15-20’ high
rather than 28-50’ as do
the Japanese and
Chinese imports, but
the flower racemes are
somewhat shorter and
the scent less intense.
Three-year old American
wisteria (photo on right)
blooms about two weeks after the non-natives and is still mostly in bud. This plant gives my garden vertical appeal and helps to soften the steely look of the fence. Husband Ben, aka String Boy, tied it to the bars where it can twine happily. The container is 22" in diameter and includes a few lilies that bloom in summer and many October onions (Allium thunbergii) that are the last flowers to burst forth in late fall and will continue until December.

When I want to admire the
imported species I can
go to the north end of
the rose garden at the
BBG, the Conservatory
Garden in Central Park,
or the terrace of the
Cooper-Hewitt Museum
and revel in the arches
of wisteria or go to any
neighborhood of brown-
stones and see the
twisted vines climbing
four stories or more.
Most grow in containers
at street level but some
are in-ground.

Wisteria grows in full
sun or part shade and
is useful for privacy in
some backyards pro-
vided your fence, trellis
or post is seriously strong. Notice in the lead photo, the pillars are made of CONCRETE. For an excellent discussion of pruning techniques see Cass Turnbull for PlantAmnesty.org.
The fresh vines pruned from any wisteria are easy to weave into fabulous wreath bases, but that’s another story.

The four story vine on
the right grows in a
2' x 6' planter at street
level.

Saturday, May 16, 2009

Who needs to join a gym?

There are times when gardening makes me feel artistic and creative. There are times when gardening makes me feel serene. But this week I was a macho, macho gardener and it felt really good.

Many people think of container gardening as small scale gardening: a pot of annuals on a front stoop, a windowbox on a terrace parapet. But the next time you walk down a New York City street, look up. Those trees you see showing over the tops of buildings are growing in containers, and they didn't get there by themselves.

For the last three years I've been working on a transplant project in a large rooftop garden. The old boxes are wood with stainless steel corners; we've gradually been replacing those with stainless steel boxes. They look sleek, modern, and elegant, and they should last much longer than the wood. (Even with liners, cedar boxes only last about 5 years.) They're also expensive, which is why we've stretched the project out over several years.

Moving trees isn't a one-woman job. I LOVE to get in there and lift with the guys (and I also have a thing for power tools) but the truth is I couldn't manage this without my crew. Remember, these are 10 foot Arborvitae we're moving around! First we clear the table and chairs out of our work area and start pulling out the old boxes. (Casey Clark puts his back into it, above.)

Some of the old boxes have rotted through. We (and by we I mean Mark Ianello) cut these up into pieces small enough to fit into large garbage bags, and the salvageable boxes are set aside. We also bag any old soil we can work off the rootballs. Note: most building won't allow you to leave your garbage behind; contractors (gardeners are contractors) are expected to remove their own debris. I call an independent garbage hauler at the end of a heavy work day like this. We take the garbage to the street and load the truck ourselves.

The new boxes are lined with landscape cloth to prevent soil from falling out the drainage holes, and we add fresh soil to the bottom of the containers.

Notice the bag of Fafard Complete Planting mix? It's the best bagged mix I've found and my first choice for container gardening. It's only sold at independent garden centers, so you may have to look a little harder to find it, but the results speak for themselves. I wouldn't use anything else.

We often do some root pruning before we lift the trees and shrubs into their new containers. This gives us more room for nutritious new soil, and opens up root space in the containers.

We decide how each tree should be oriented, then lift it into place. Each box is filled with more soil and the taller trees are wired to the iron railing that surrounds the terrace.

Clean-up is the most tedious part of the day. Despite working on a tarp, soil falls into the cracks between roof tiles. I spend an hour with a shop vac and a crevice tool, then water in the new transplants and hose down the tiles. I think the clean-up is harder on my back than the lifting!

Step one is complete. The new boxes look great (fortunately my client agrees) and there's now plenty of room to add herbaceous plants among the woodies. This has been an issue lately; the old boxes were so chock full of roots that I could barely squeeze in a handful of pansies.


At the end of a day like this I'm exhausted but satisfied. My walk home through the park is considerably slower than usual, but I remind myself that I got a pretty good workout and earned my living doing it. Who needs to join a gym?

Wednesday, May 13, 2009

RETHINKING DANDELIONS

Instead of using chemical weed control, find a couple of kids who are plenty
bored waiting for their dance class to begin,one who’s fidgeting while you
get your tires rotated, or
growing grumpy waiting
for big brother to emerge
from school. Pick a large
bunch.

Dandelions are in the park,
in cracks between side-
walks,in empty lots. I
recently knocked on a door
to ask the surprised home-
owner if she minded if we
picked dandelions from her
yard. Dandelions are free for the taking, and twenty
stems make a fabulous if ephemeral craft kit. People
of a certain age learned to make these chains in childhood, but for today’s children the skill is likely to be a revelation.

A lawn studded with golden
dandelions is not ‘an ugly
lawn’ as my TV just
pronounced via Scott’s
Weed & Feed. This is a
lawn like a ‘jewelry store’
according to my favorite
8 year old, jewels ready to
fashion into the rings and
things she just learned.
Bright yellow splotches
in green grass can
be charming when you re-label
the view as a source of
pleasure. Young greens
for salads with hot bacon
dressing? Flowers for cookies?

How To Make Dandelion Jewelry
1. Pick a bunch of dandelions, with longish stems. (Works with clover or wild daisies too.)
2. With your thumbnail cut a slit about 1/2 inch long in the middle of the stem.
3. Slip a second dandelion stem
through the slit and pull gently
until the second flower reaches
as far as it can go.
4. Make a slit in the second flower
and keep going until your chain is long enough to make a crown for a King or Queen, a tiara for a
princess, a necklace or a wrist band.
5. To end off, make a final slit at the end of the last flower and loop the first flower back through it. Or tie the two ends carefully in a knot. Double click on any photo to enlarge.

Sunday, May 10, 2009

bigger than a bread box (barely)


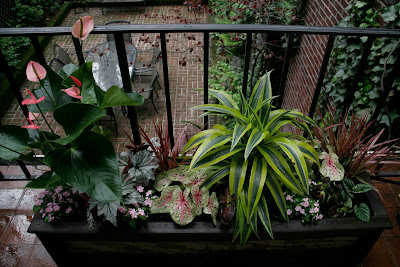
Do you fear the tropical plant? If your answer is yes I won't hold it against you. You're probably just uninformed. The fact is that LOTS of our easiest, most popular garden annuals are tropical plants. In their native habitats they live for years, but since they're not frost-hardy, they work as annuals in our temperate gardens.

Coleus? Impatiens? Caladium? All tropicals. You've been growing them for years and never even knew...

There are also plenty of tropical plants we use as houseplants.
Anthurium?
Begonias?
Dracaena?

That's right. Tropicals.

New York City in summer offers a pretty close approximation of the tropics: hot and humid. So why not take advantage of that, and use a combination of tropicals to plant a container garden? By incorporating traditional houseplants into your outdoor display you do yourself several favors:

1) You'll be expanding your plant palette and insuring that YOUR window box doesn't look like everybody else's.
2) You'll be able to start out with bigger, beefier plants than you would if you were drawing only from traditional annuals. It's a lot easier and less expensive to find a 3 foot tall dracaena to use as a centerpiece than it is to buy a 3 foot tall fuchsia standard.
3) You can bring your favorite plants indoors before frost hits and enjoy them all winter long.

I do this every year for a client who has three planter boxes on a second floor balcony. Each box is 4 feet long, 1 foot wide, and 1 foot deep. The location gets NO direct sun, so I choose shade plants that deliver most of their color via foliage, not flowers. I've found the mini-impatiens (in this case Firefly Blush Pink) bloom better in low light than many other impatiens.

The boxes look full right from the start and all sorts of surprises emerge over the growing season. Did you notice the rex begonia vine in the background?

No? You will when it's 15 feet of glorious purple, silver, and green foliage crawling all over the railing.

We can't all get away someplace lush and tropical for vacation, but if you've got a few containers, you can create a vacation landscape in your own back yard.

Wednesday, May 6, 2009

ON RAMPS

Other Ellen forages in the wild; I’m more likely to forage at the Greenmarket. Mid spring takes me to my favorite, Union Square, to seek ramps also known as wild leeks, (Allium tricoccum). Ramps are the first of the outdoor greens to be offered for sale in spring, prized by chefs and home cooks alike.

They have a sweetish, but
strong onion flavor, used by
AmerIndians and Settlers for
cooking, spring tonics, and
cures for colds, fevers, and
worms in children. They
grow wild from Nova Scotia
to Georgia and West to
Minnesota according to the
Audubon Field Guide to
North American Wild-
flowers.


If you do go out foraging in the wild, seek them in moist woods, often under maple trees. Note that like many decorative Alliums, the leaves die back before the flowers appear. To mark a patch in summer for next springs’ harvest, look for flower stems with cream-colored umbels, leaves dead or dying back. Even then, it's hard to differentiate them from wild garlic (Allium canadense) and wild onion (Allium cernuum) which is unpleasantly strong. Use a good field guide.Check for a definite onion aroma of ramps to be safe from Death Camass.

Buy ramp bulblets or seeds for your own garden from the Ramp Farm. Although this farm still has seeds they're no longer taking orders for '09 shipments of the starters.

Usually one or
two stands sell
ramps in the
Greenmarket, often mobbed by area chefs, laden with a week’s supply. Edible parts are young leaves, stems and bulblets, as in scallions. Tasty varieties of mushrooms are available in the market simultaneously.

The New York Times offers a recipe or two every April. Here’s one of mine, a simple but delicious combination featuring ramps and mushrooms.Spring Rice Pilaf with Ramps
From Garlic, Onions & other Alliums by Ellen Spector Platt,
Stackpole Books, 2003

2 cups white or brown rice
4 cups boiling water
4 tablespoons butter
½ teaspoon salt, or to taste
Ground pepper to taste
15 ramps, more or less
Two medium onions peeled and chopped
½ pound assorted mushrooms, washed, trimmed and sliced
1 cup dry white wine, such as Muscadet
Grated Parmesan cheese

1. In a saucepan, saute the onion in 2 tablespoons of butter until golden.
2. Stir in the rice until coated with butter. Add salt and pepper.
3. Pour in boiling water, cover the pan and cook gently for 30 minutes. Don’t lift the lid. After thirty minutes turn off the burner.
4. Meanwhile, prepare the ramps. Wash carefully, cut off roots and slip outer skin off stems. Cut off stems with bulblets and chop them. Chop leaves keeping them separate
5. In a shallow pan, saute the mushrooms in the rest of the butter for about ten minutes, and add the chopped ramp stems. Cook another minute or so, then add the wine and reduce. The mushrooms and ramps should be ready about the time the rice is ready.
6. Fluff the rice with a fork, add the mushroom mixture, fluff again. Then pour into serving bowl and sprinkle with chopped, uncooked ramp leaves. Serve with the grated cheese on the side.

Serves 8 as a side dish, or 6 as a main dish.

  © Blogger template Joy by Ourblogtemplates.com 2008

Back to TOP